How to Connect to a Wi-Fi network (wireless Internet)
This guide will show you how to connect to a Wi-Fi network in just a few steps.
When you get a new laptop or move to a new location, one of the first things you need is an internet connection.
Connecting to a Wi-Fi network on Windows is quick and easy if you follow a few simple steps.
In this guide, you’ll learn how to do it in less than 10 minutes.
Start Connecting to a Wi-Fi Network Step by Step
Step 1: Open Wi-Fi Settings
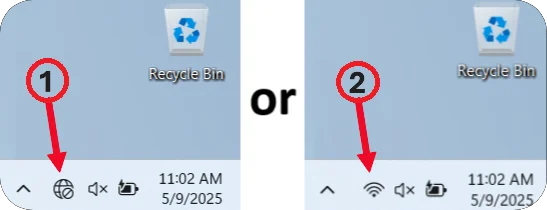
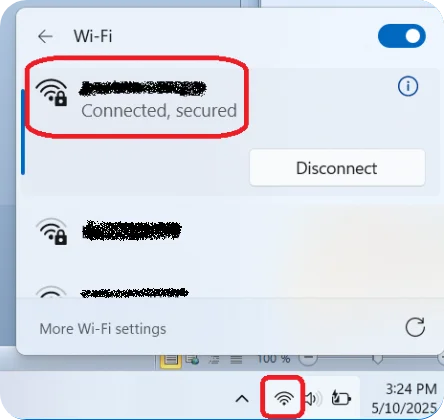
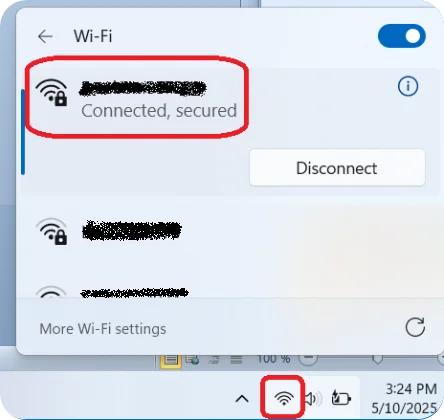
Click on the Wi-Fi icon in the taskbar. At the bottom right of the screen, on the taskbar. the icon can be either a planet with a forbidden meaning, or small waves as you see in these two screenshots.
Step 2: Make sure Wi-Fi is enabled
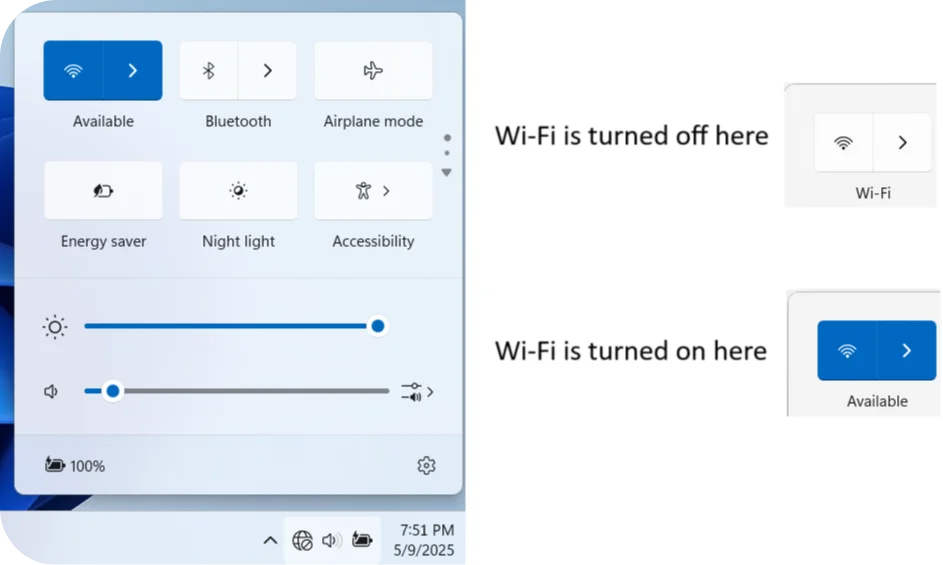
The window on the right will open. You need to check if Wi-Fi is enabled.
If Wi-Fi is disabled, click the wave symbol to turn it on.
Step 3: Choose a Network
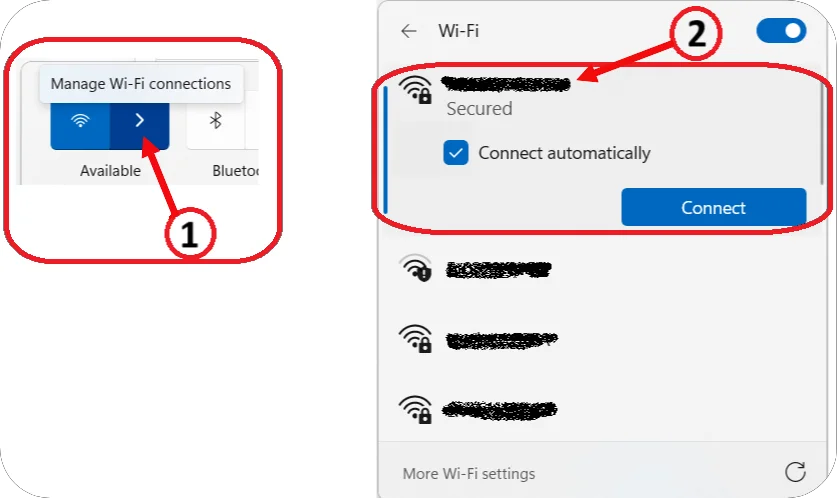
Click on the small arrow icon, as shown in the screenshot marked with the number “1“. This will show you the list of available Wi-Fi networks.
Look at the list and find the name of your Wi-Fi network.
💡 Tip: The name (also called SSID) is usually written on a sticker on the back of your Internet box. You can also find it in your box’s settings menu.
Once you see your Wi-Fi network name in the list, click on it.
You should now see a new screen, as shown in the screenshot marked with the number “2” in the tutorial.
Step 4: Enter the Password
If the network is secured, you will see a small closed lock icon on the Wi-Fi symbol.
Before clicking Connect, don’t forget to check the Connect automatically box. This option will make your device connect to the network automatically in the future, so you won’t need to select the network or enter the password again every time.
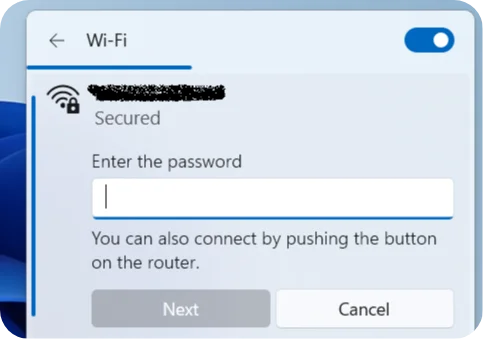
Now, click on Connect. A dialog box will appear asking you to enter the password.
The Wi-Fi password can typically be found on the back of your Internet box or in its settings menu.
Once you have the password, enter it in the dialog box, then click “Next” to complete the connection.
Step 5: You are now connected! 🥳🥳🥳
Check the connection: Once connected, you should see “Connected” under the name of the Wi-Fi network. You may also see a Wi-Fi icon in the taskbar indicating that you are connected.
From now on, the connection will be automatic.
If you’re still having trouble connecting to Wi-Fi, don’t worry, let’s go through some easy steps to fix the problem.
🔧 Wi-Fi Troubleshooting Steps
Step 1. Check the Password
Make sure you’re entering the correct Wi-Fi password. Watch out for capital letters, numbers, and special characters. The password is usually written on a sticker on the back of your Internet box.
Step 2. Restart the Router
Turn off your Internet box, wait about 30 seconds, then turn it back on.
Wait a couple of minutes for the router to fully restart.
This can fix many small connection issues.
Step 3. Make Sure You Are Within Range
If you’re too far from the router, the Wi-Fi signal might be too weak. Try moving closer and see if the connection improves.
Step 4. Forget the Network and Reconnect
If you’re having trouble connecting or the internet doesn’t work even when you’re connected, try removing the saved Wi-Fi network and connecting again.
Click on the Wi-Fi icon, then click on the small arrow icon as shown in Step 3. Find your network in the list, right-click on it, and select Forget. This can help if your device is having trouble connecting to a previously saved network.
Next, click on the Wi-Fi icon again, select your network from the list, and connect to it like the first time.
Don’t forget to check the Connect automatically box so your device will reconnect on its own in the future.
Then, enter the Wi-Fi password to complete the connection.
5. Check for Service Outages
If nothing works, the issue might be with your Internet provider. Visit their website, use their app, or call them to see if there’s a network issue in your area.
I recommend this tutorial that shows you how to connect to the internet even without Wi-Fi!
If you have an Android smartphone (like Samsung, Xiaomi, OPPO, etc…), check out the How to Share Wi-Fi from Android to PC tutorial.
If you’re using an iPhone, go to the How to hare Wi-Fi from Iphone to PC tutorial.
We hope this guide helped you get connected and solve any Wi-Fi issues you were facing.