How to customize the taskbar
How to customize the taskbar is an essential skill to make your desktop cleaner, more practical, and better suited to your needs.
Whether you want to move it, hide it, or change what appears on it, we’ll guide you through each step.
But customization isn’t just about looks, the taskbar is also a powerful productivity tool.
Keeping it well-organized can help you work more efficiently and streamline your daily workflow.
There’s a lot to explore in the taskbar settings menu, so take your time to customize it in a way that fits your workflow perfectly.
💡 Tip: Dare to be curious. Don’t hesitate to run tests to see how it works.
Step 1: What is the taskbar?
Before customizing your taskbar, it’s important to understand what it does. Once that’s clear, you’ll know what you actually need and how to set it up to make your computer easier to use.
The taskbar is first and foremost a powerful tool located at the bottom of your screen. It gives you quick access to many essential features:
- The Start menu, where you can access apps and settings
- The search tool, to find content on your PC or online
- Pinned applications, which remain visible on the taskbar even when they’re not open
- Open applications, which have a small underline below their icon
- The currently active (selected) app, which is not only underlined but also appears more highlighted or slightly brighter
On this taskbar, we can see that I’m currently working in Paint, it’s the active application, which is why its icon appears highlighted.
We can also see that File Explorer and Google Chrome are open, indicated by the small line underneath their icons.
Finally, the Outlook icon is visible but has no line under it, which means the app is pinned to the taskbar but not currently running.

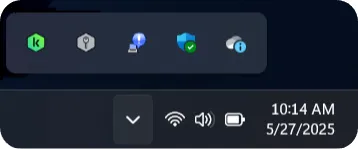
On the right side, you’ll find what’s called the system tray (or notification area), which includes:
- The time and date
- Your battery status (on laptops)
- The volume control
- Your network connection status
- A small triangle icon (called a caret). Clicking the caret shows hidden icons of background apps like Dropbox, Bluetooth, your antivirus, and more.
Now that we have a better understanding of the taskbar, we can start customizing it to suit your needs.
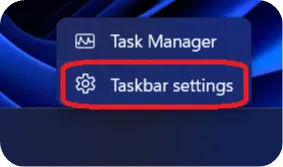
Step 2: open the taskbar settings
To open the taskbar settings, right-click on the taskbar, then left-click on Taskbar settings.
The taskbar customization page is now open. Let’s go through all the important features one by one.
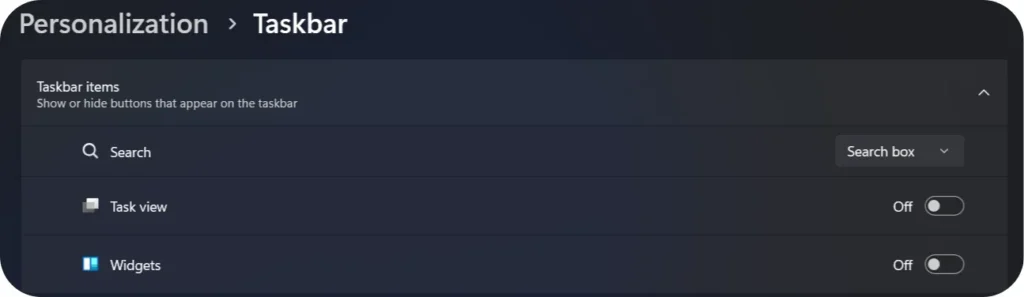
Step 3: Taskbar Items
Search:
Shows the search box or icon so you can quickly find files, apps, or settings.
💡 Tip: If you don’t see the contents of a menu, you need to click the small arrow outlined in red on the right side of the menu.

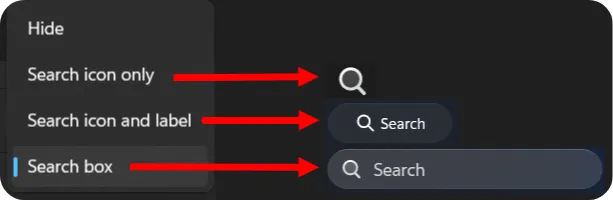
For the Search option, you have four choices:
– Search box: Adds a full search bar to the taskbar
– Hide: Completely removes the search feature from the taskbar
– Search icon only: Shows just the magnifying glass icon
– Search icon and label: Displays the icon with the word Search
Task view:
To activate it, click on Off, it will then switch to On.
The icon shown here will then appear on your taskbar.
This feature lets you view all your open windows and manage virtual desktops easily.

Widgets:
Displays small panels with things like weather, news, calendar, and more.
The icon will appear on the right side of the taskbar.
To display the page with all the information, simply hover your mouse over the icon.

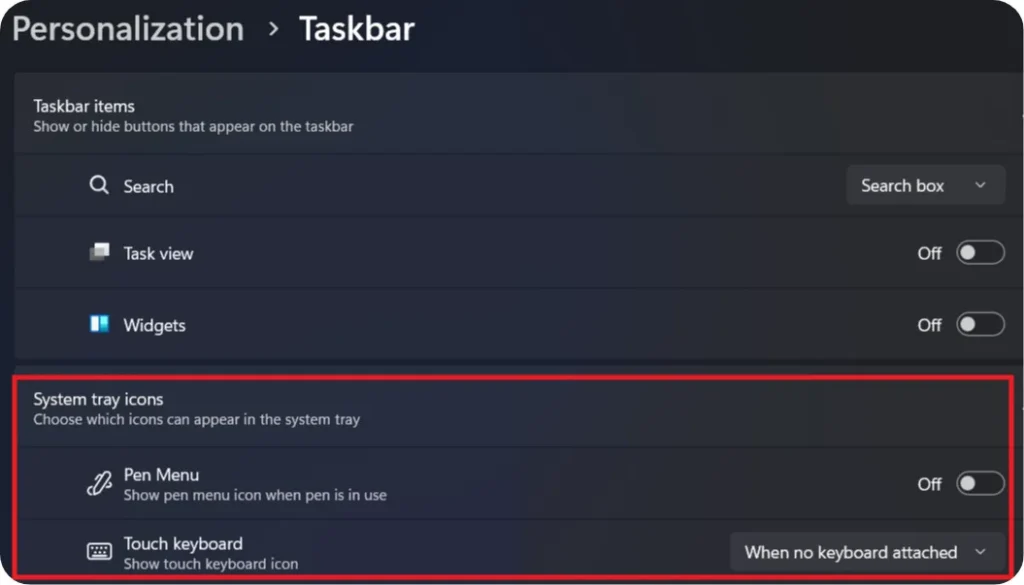
Step 4: System tray icons
Pen menu:
The Pen menu icon usually appears if you’re using a touchscreen or if a digital pen is connected to your device.
This menu gives you quick access to useful tools for writing or drawing.
Touch Keyboard:
This setting controls whether the Touch Keyboard icon appears in the system tray (the far right part of the taskbar).
With this setting, you can choose:
– Never show the icon
– Always show the icon
– Show only when no physical keyboard is attached (If the computer doesn’t detect a physical keyboard, it will automatically display the icon).
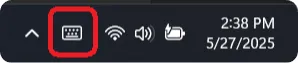
The Touch Keyboard is a virtual keyboard that appears on your screen. It’s especially useful if you’re using a touchscreen device, or if your physical keyborard isn’t available.
To use it, simply click the icon and the virtual keyboard will appear.
You can then type using your touchscreen if you have one, or use your mouse if you don’t.
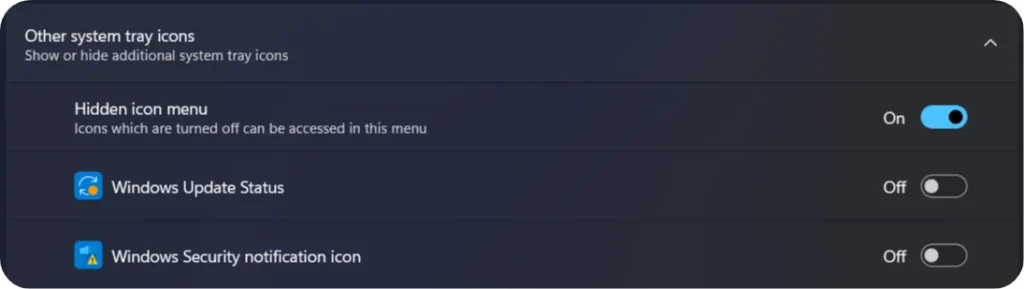
Step 5: Hidden icon menu
This setting lets you choose whether the caret icon (the upward-facing arrow) is visible or not.
When Hidden icon menu is turned On, the caret icon appears in the taskbar.
If you turn it Off, the arrow disappears, and you won’t be able to access hidden icons through this menu.
Other applications will appear in the caret menu when they are turned off. By default, all of them are visible.
Step 6: Taskbar behaviors
Taskbar alignment:
The Taskbar alignment setting lets you choose where the icons (like the Start button, search, and app shortcuts) appear on your taskbar.
By default, it’s centered. To adjust the alignment, click on the selection box and pick the option you prefer, either Left or Centered.
Automatically hide the taskbar:
You can choose to hide the taskbar by checking the box on the left side of the menu.
Once the taskbar is hidden, it will stay out of sight to give you more space.
To make it reappear, simply move your mouse to the bottom of the screen, it will show up automatically.
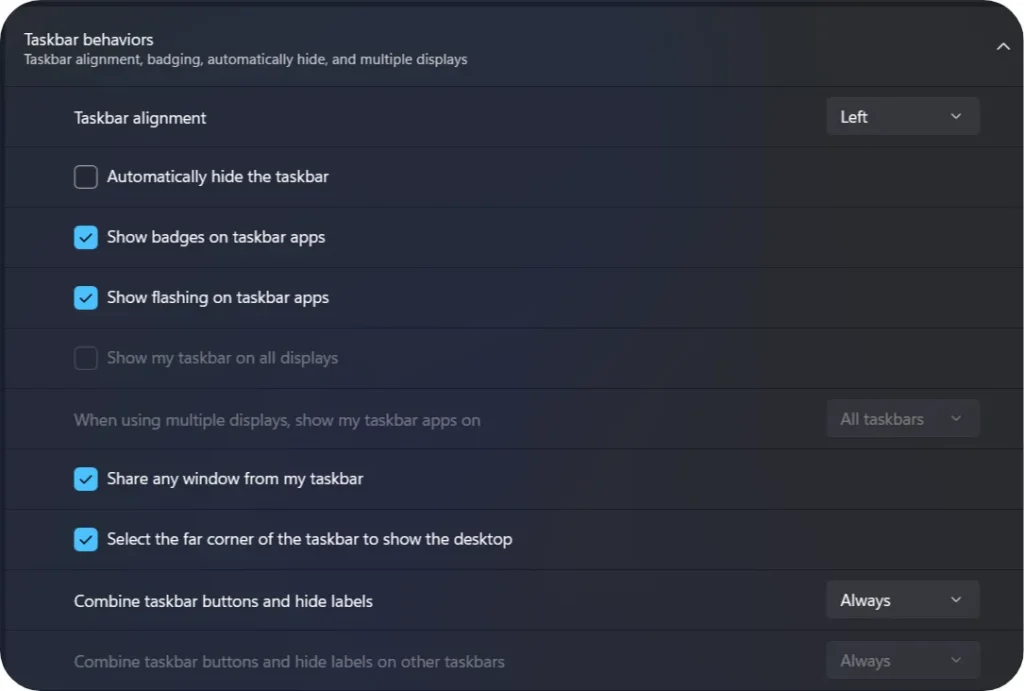
Show badges on taskbar apps:
Displays small indicators (badges) on taskbar icons.
For example: a number showing how many unread messages you have in an app.
Show flashing on taskbar apps:
Allows apps to briefly flash on the taskbar to get your attention (e.g., a notification or an update).
Show my taskbar on all displays:
If you use multiple monitors, this option lets you show the taskbar on all screens (Otherwise, it stays on the main display.)
When using multiple displays, show my taskbar apps on:
Allows you to choose where app icons appear when using multiple monitors:
All taskbars – on all screens.
Main taskbar and the one where the window is open
Taskbar where the window is open
Share any window from my taskbar:
Displays a quick button to share a window (for example, in a Microsoft Teams meeting) directly from the taskbar.
Select the far corner of the taskbar to show the desktop:
Allows you to minimize all windows and show the desktop by clicking the bottom-right corner of the screen.
Combine taskbar buttons and hide labels (Always):
Groups windows from the same app (like multiple Chrome windows) under a single icon and hides the window title.
A useful option to keep your taskbar cleaner.
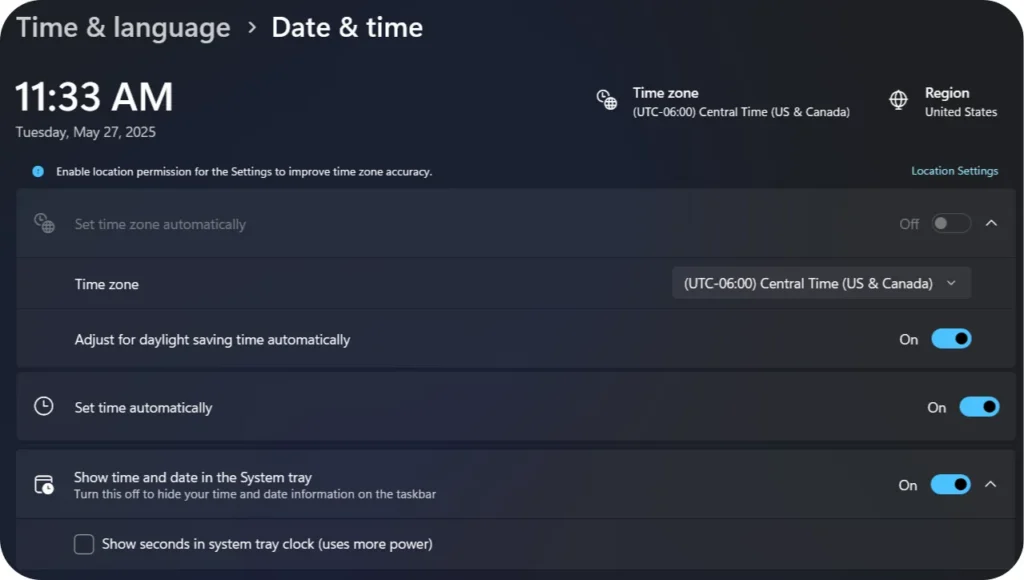
Step 7: Date & time
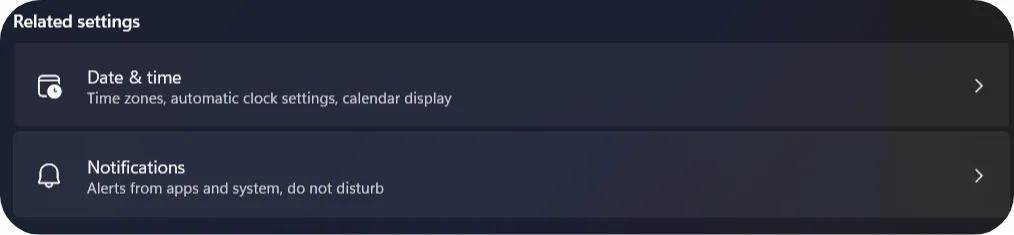
In the Related settings section, click on Date & Time to open the menu.
In this menu, most of the information is already filled in correctly.
In my screenshot, the Set time zone automatically option is grayed out because I haven’t enabled location services. In this case, you need to set the Time zone manually.
Adjust for daylight saving time automatically:
Turns automatic daylight saving time changes on or off. We recommend keeping this setting on.
Set time automatically:
Windows automatically sets the time via the internet. We recommend keeping this setting on.
Show time and date in the System tray:
You can choose whether or not to display the time in your taskbar.
Show seconds in system tray clock:
If you want to display the time with seconds, you need to check the box. Note that this may use more power.

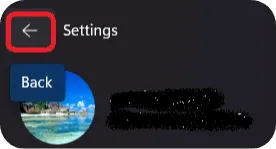
To go back to the Themes menu, you can click the arrow at the top-left corner of your screen.
Step 8: Related settings
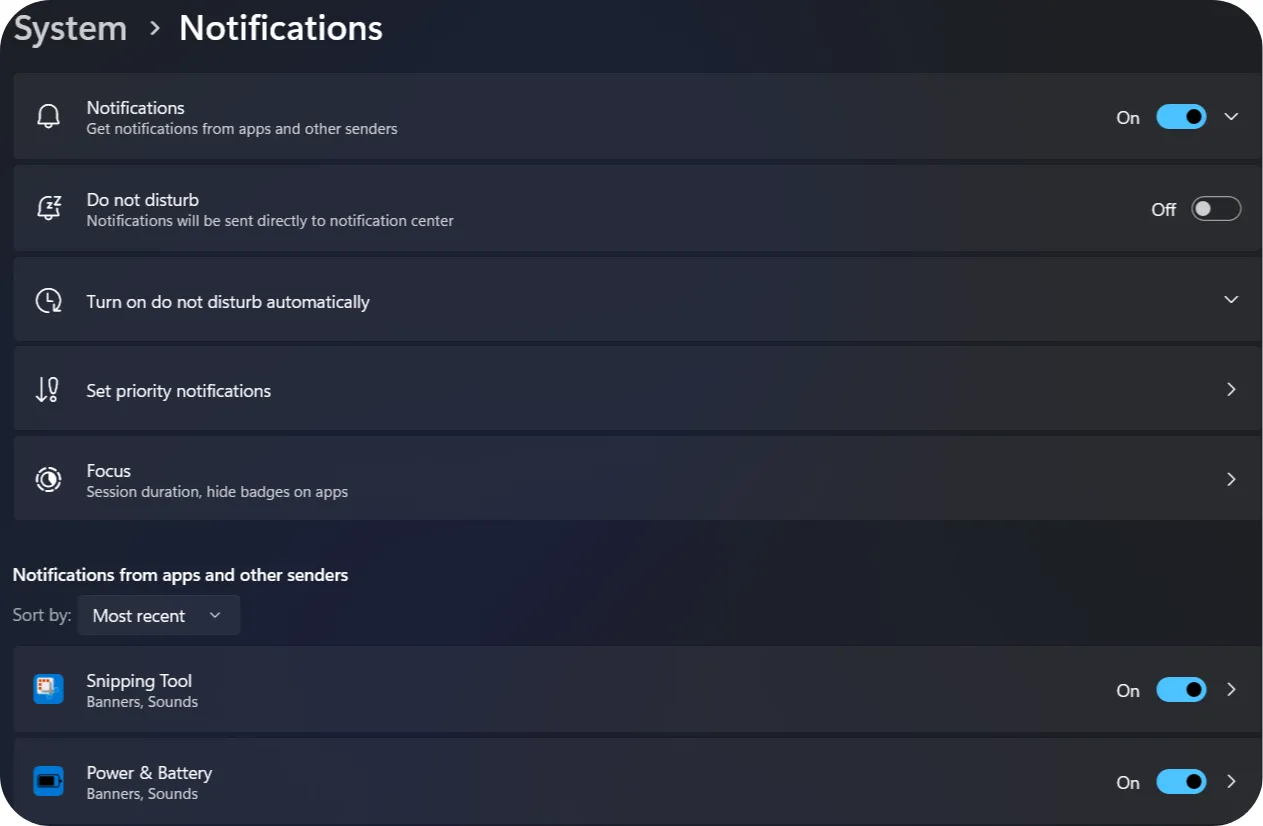
In the Related settings section, click on Notifications to open the menu.
This menu allows you to manage notifications sent by Windows and apps.
Notifications: (On/Off)
Turns all notifications on or off for the computer.
When enabled, you’ll receive notifications such as emails, updates, messages, and more.
Do not disturb: (On/Off)
When you turn on this option, notifications stop appearing on the screen.
The times when you don’t want to be disturbed can be configured using the “Turn on Do Not Disturb automatically” menu.
Your device will activate Do Not Disturb mode automatically at the times you choose.
Set priority notifications:
Allows you to choose which apps or contacts can send you notifications even when Do Not Disturb is on. Useful to avoid missing important messages.
Focus:
Allows you to create focus sessions. A Focus session minimizes notifications and hides certain visual elements, like icon badges.
Notifications from apps and other senders:
A list of apps that can send notifications. When set to On, you’ll receive notifications from that app.
Conclusion:
This tutorial was a bit longer than usual because Windows 11 offers many notification settings that can seem a bit technical. We’ve covered the essentials so you can better manage alerts from your system, customize your experience, and stay focused when needed.
There are still some more advanced options I didn’t cover in detail, including ways to customize the taskbar. But you now have a solid foundation to explore further. Feel free to dive into the settings and find what works best for you!